Start a business online checklist

My vision with this “How to Start Business Step by Step” guide is to give you an overview of the main things that you need to do to launch a business.

Having started my own business a few years ago, I know how hard it can be to take those first steps. There is so much to do that it can leave you feeling overwhelmed, not knowing where you begin. The guide and checklist below should help you to get organised and prompt you to take action!

Disclaimer: This post may contain affiliate links. This means, I get a commission if you purchase through my links, at no cost to you.

How to Start Business Checklist

It is much easier to get started when you have a clear plan. This is why you should print out the checklist below, put it somewhere you can see it every day, and start working on it. You don’t need to do it all in one sitting. Even taking the smallest steps will bring you closer to your goal. The important thing is that you keep moving forward!

Breaking up your big goal of starting a business into small, manageable steps will make things seem less overwhelming and will encourage you to take action.

Using the format of a checklist will help you stay on track and keep motivated. I love the satisfaction of an item crossed of my to-do list (and I am hoping you do too!).

Once you have crossed off all the items on your list you will have a clearer vision for your business and an action plan moving forward. Imagine how good it will feel!

Here’s your checklist with the 24 basic steps to start a business:

Click here to download a PDF version of the “How to Start a Business Step by Step” checklist. 

1- Choose a name

It all starts with a name! Choosing your business name can be more difficult than it sounds.

You want to find something that is:

  • Easy to spell
  • Catchy
  • Simple (but not boring)
  • Easy to remember
  • A name that matches your business tone

Read this blog post for more tips on how to choose your business name (and a rundown on some other important admin things to consider)

2 – Define business niche

When you are starting a business, it can pay to spend a bit of time thinking of what your area of specialty is going to be. 

Your business doesn’t have to appeal to the masses, but having a well-defined niche will allow you to present your business in a way that it will truly resonate with your target audience.

RELATED READING: 7 awesome benefits of having a business niche. 

3 – Think about who is your ideal customer

As you get ready to present your business to the world, it is important to think about who your ideal customers are. Every business will have a different audience, and it is key to define yours.

A good way to go about this is to create what we call an “ideal customer avatar.” This just means creating an imaginary person that would represent your ideal customer.

Here are some initial questions and ideas that you can consider when thinking about your ideal customer.

  • What are some key demographics? (age, gender, location)
  • What are their interests/ hobbies?
  • What are their values?
  • What problems/ needs do they have that your business is solving
  • What motivates them to seek out a business like yours?
  • What type of content do they engage with? (blog posts, emails, videos, social media etc)
  • Where would you find them online? (video sites, social media, search engines, etc)

Once you have a clear idea of what your ideal audience looks like, you can think about how to present your business in a way that captures their interest and speaks to the specific problems that they have.

You may have more than one ideal customer, and that is ok! Create more customer avatars to cover all of your main customer types. 

RELATED READING: How to define your ideal customer and why it matters

4 – Define the services that you will offer

Spend some time thinking about the services that you are going to offer. Keep in mind your ideal customer and the problems that you can solve for them. 

It can be a good idea to do some market research, including competitor analysis. Doing market research doesn’t need to be hard! Read this blog post for more information on how to do market research and the questions to ask.

5 – What makes your business different?

As you research what the competition is doing, think about your Unique Selling Point. What makes you different from other similar businesses out there?

You can learn how to identify what makes your business different from the competition in this article

6 – Design your logo

If you don’t already have one, you will need to create a logo for your business. This is an important step as your logo will help establish how your customers perceive your brand. As you are designing your logo, you can think about questions such as:

  • What do you want your logo to say about your brand? 
  • Do you want to portray a serious or more chilled vibe? Refined or casual? Mature or young?
  • What colour and font are you going to use? (more about this below)

7 – Choose colour palette and typography

Apart from your logo, you should define your brand’s colour palette and typography. These will work together to create the style and feel of your brand, so spend some time choosing an option that not only looks good, but also sends the right message to your potential customers.

You can have a look at Canva’s guide to branding for more info and guidance.

It is a good idea to make a record of your final choices once you’ve made your selection. You can use this blank branding sheet to put everything in one place. This will make it easier for you to refer back to when you need to.

Once you have these defined, you can use the same colours and fonts throughout your marketing material to create a cohesive and beautiful look.

8 – Set technical foundations for website

Don’t panic, this may sound a bit intimidating, but it is very easy to organise! To get your website up and running you need a few things:

  • A domain (this is your url)
  • Web hosting (a company that provides you with the technology and services so that your website is displayed online)
  • A content management system (which is the system that allows you to build your website).

I use WordPress as my content management system, which is one of the most popular systems out there. I find it easy to use and it gives you the opportunity to scale your website as your business grows. I will not cover any of the other website builders here as I want to stick to what I know and use on a daily basis. 

There are heaps of options out there to get these technical bits and pieces organised. Many companies offer an all-in-one package that allows you to buy the domain, organise web hosting and install WordPress all at the same time. 

For example, you can see this WordPress hosting plan from Bluhost, starting at just $2.95 per month. 

9 – Make your site secure

As you are setting up your website, it is recommended that you choose an option that comes with a SSL Certificate (you can do this very easily with Bluehost as you are setting up the site). This will ensure the safety and privacy of the data going to and from your site.

You can read more about SSL Certificates on the Blue Host blog

10 – Set up your business email

Once you have your domain, you can set up your business email address. I like using Gmail for both my personal and business emails. Here’s more information and set up instructions for Gmail for business. 

You should also be able to set up emailing options via your web host (such as Go Daddy or Blue Host – check what options are available through them)

11 – Define your tone of voice

Tone of voice is how the character of your business comes through in your words. It’s not about what you say, but rather the way you say it. There is no need to overthink this, but keep this idea in mind as you start creating content for your business.

Your brand will have a particular voice that suits your audience and also showcases your personality. Using the right brand voice will play an important role in making sure your message engages and makes a lasting impression on potential customers.

The type of audience you have will define the tone that you use. If your target audience are professionals such as lawyers and accountants, you would generally use a formal and professional voice. If you are promoting a dog walking service, you’ll likely be a lot more casual.

Showcasing your personality is key! Use a voice that feels natural for you. Using your voice and showcasing what makes you special through your content will help create a real connection with your audience.

12 – Write copy for your website

Now that you have defined your ideal customer and your tone of voice, you should write the copy for your website.

To get started, you will likely need to think about these 4 pages:

  • Home page: your homepage should clearly explain what your business does. You have very few seconds to engage your visitors, so make sure that your message is clear. Think about the problem that you are trying to solve for your customers. 
  • About: Think about your personal story. This page should talk about you, your background, but more importantly, why you are the right person to solve your customer’s problem. Why should they trust you?
  • Services: explain the services that you offer and how you can help.
  • Contact: make it easy for potential clients to connect with you.

13 – Photoshoot

Set a couple of hours aside one day and get some personal photos taken to use on your website and social media. Take time to prepare beforehand to make sure you get the right look.

Think about what you are going to wear and where you are going to get the photos taken. Choose a nice, professional background. Think about the type of service that you offer and how you want to present yourself to your potential customers.

14 – Get stock photos

As you create content for your website and social media you will need lots of photos. You will use your own images, but you may also want to use stock photos. It is very important that you only use images that have the right licence for your intended use. Don’t just Google and choose an image from the search results, this could get you in legal trouble.

There are several stock photo websites that allow you to download images for free. Check these ones out:

Pexels

Raw Pixel

Unsplash

15 – Build your website

Now that you have defined your branding, set up the technical foundations for your website, written your copy and gathered your images, you can put together your website!

When it comes to building your website, you can either build it yourself (it is not as scary as it sounds, I promise!) or go for a low cost “done for you” option. I don’t have a tech background and have built several websites myself.

Nowadays, there are several website builders that make it very easy to DIY. I like using Elementor, which has a free basic plan which is more than enough to build a starter website.

And the good news is that you don’t need to start form zero. There are beautiful looking templates that you can get (many of them are free!), install on your site, and then adapt to create the look that you want for your business. This is a great way to build a professional looking website if you haven’t done it before. 

Check out this blog post I wrote where I go into the process for building a website in more detail.

If you like my website, you should check out Bluchic. They offer a range of easy to edit and absolutely stunning WordPress templates. 

They even offer an installation service that makes creating a professional website easy and affordable. 

YOU MAY ALSO LIKE: The 3 tools I used to build my website

16 – Create social media profiles

It is no secret that social media is key when it comes to online marketing. This doesn’t mean that you need to be everywhere though!

Decide where you want to start creating a presence for your business and set up those profiles or accounts. Some places you might want to think about are: LinkedIn, Twitter, Facebook business page, Facebook group, Instagram, Pinterest, and Youtube.

YOU MAY ALSO LIKE: How to set up your Instagram business account.

17 – Set up email marketing

Even if you don’t plan to tackle email marketing for a while, it is a good idea to set things up so you are ready to start growing your email list when the time comes.

I use and recommend Convertkit

Convertkit offers a totally FREE basic plan for those who have less than 1,000 subscribers, so check them out!

To keep things simple as you are getting started, adding a “subscribe for updates” form to your website would be enough. Once you are ready to grow your business you can switch to a more effective list building strategy.

18 – Install Facebook Pixel

Facebook Pixel is a code that you install on your website to collect data about what visitors to your site do online. Even if you are not planning to start running Facebook ads for a while it can be a good idea to install Facebook Pixel on your website from day one so you can start tracking data. This will help you make your ads more effective when you are ready to advertise.

If you are using WordPress, doing this is as simple as installing a plugin. The instructions from Facebook are here.

19 – Launch website!

Now that your website is finished and all the essential tools are set up, you are ready to launch! Send a link to your friends and family and ask for their feedback. It is a good idea to get a second pair of eyes to check things like spelling, grammar, and readability.

Would you send me the link? I would love to see what you have created!

20 – Create social media templates

As you get ready to share content on social media, you should spend some time creating some brand-aligned templates so that you have them ready to use when the time comes. Think about your colour palette and typography to keep a cohesive look throughout your online presence.

If you want to save a bit of time, you can have a look in my shop for ready-made social media kits. They are easily customisable using Canva, so you can change colours and fonts to make them your own.

21 – Create content

Now that we are set up on social media and have your templates ready to rock, it is time to start posting. Create a few pieces of content to introduce yourself and your business to the online world.

22 – Choose social media scheduler

It can be a good idea to use a social media scheduler to save time. These are systems that allow you to schedule several posts to run on different platforms all at once. You can select the time and date when they will run in advance, allowing you to plan in advance and remain consistent.

There are a few options out there, but my scheduler of choice is Tailwind. I’ve been using it for over a year and it has made my life so much easier.

If you want to learn about how I batch create my Instagram posts in advance to save heaps of time, head to this article where I share my step-by-step Instagram posting system.

Try Tailwind for Instagram for Free

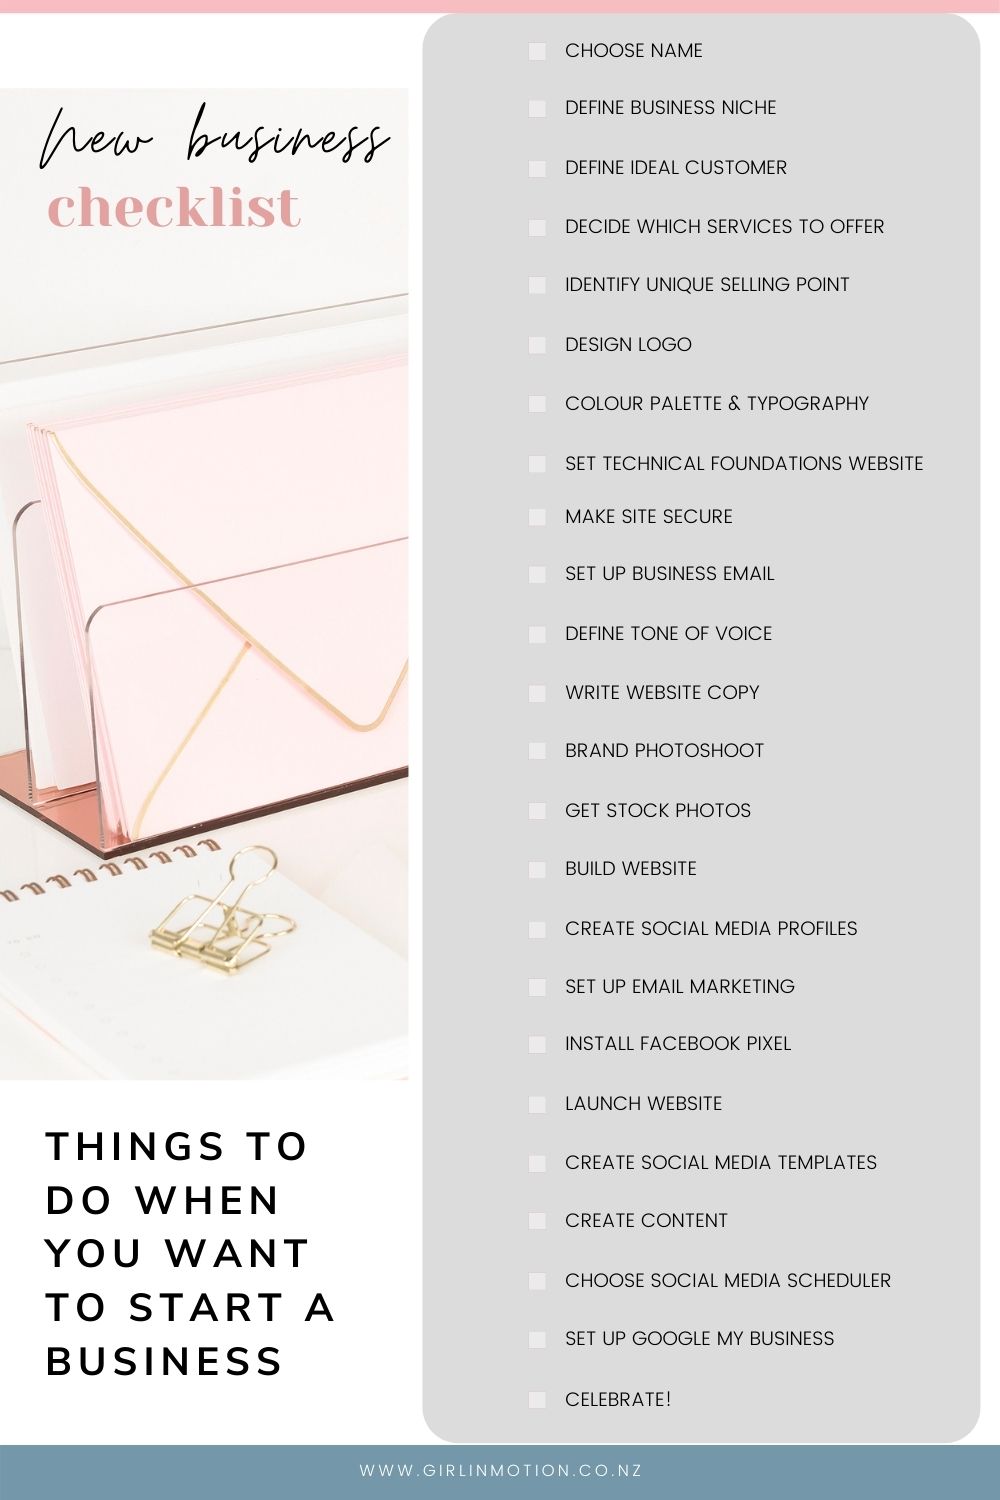
23 – Set up Google My Business

Setting up Google My Business is very important if you are running a business that relies on local customers. Your business profile will appear in Google Maps and in the local results of Google Search.

Follow this step-by-step guide from Google to set your free business listing.

24 – Celebrate!

Once you make it to the final step of the “How to start a Business Step by Step” guide you should pat yourself on the back! A lot of people talk about starting a business but that’s as far as they go. They get stuck on the “talking” or “research” stage and never move forward. So when you’ve finished making your way through the checklist, take the time to celebrate your courage. What will your do to reward yourself? Get in touch and let me know 💕

READY TO GET STARTED? DOWNLOAD MY FREE NEW BUSINESS WORKBOOK

Want more tips and inspiration? Read these articles: 

Latest blog posts

A checklist to help you start your own business
Step by step guide to becoming your own boss
Launch your own business guide