If you are a service provider wondering how to set up an instagram business account, then you’ve landed in the right place!
Instagram is an amazing platform for solopreneurs. It provides an excellent venue to connect with your ideal clients, educate them, and establish yourself as an expert in your field.
Instagram also lets you put a face to your business, and build that human and emotional connection that, ultimately, is going to bring sales. People buy from those they know and trust, and Instagram is the perfect platform to start building connections.
Ready to set up your Instagram business account? Read on for step-by-step instructions!
Disclaimer: This post may contain affiliate links. This means that I get a small referral fee if you purchase a product or service through my links. There is no additional cost to you!
Why Create an Instagram Business Account?
When signing up for an Instagram account for your business, it’s crucial that you select the “Instagram Business” option. This is because, unlike with a personal account, Instagram for Business provides you with real-time analytics that track your account performance.
This means that you can easily keep an eye on what’s working (and not) for your business and adjust your social media strategy as needed.
Instagram Business accounts also tend to get taken more seriously than personal accounts – even if you are the only person behind your brand. Having an entire page dedicated to your business tells customers that you are a professional, and sets the foundations to start building a trusting relationship.
An Instagram Business account will allow you to include your industry/niche directly in your bio (which is amazing for Instagram SEO purposes), an address (if you have one), and a contact button directly from your profile page.
Having a well-developed profile, alongside regular content, will help you connect and nurture your audience.
Setting up an Instagram Business account will also enable you to reach potential customers more easily, as it allows you to utilize promoted posts and Instagram ads.
Overall, creating an Instagram Business profile will improve your brand’s credibility, and give you access to in-platform opportunities (like analytics and promotions) that personal accounts are not privy to.
YOU MAY ALSO LIKE: How to Define Your Ideal Customer (And Why It Matters)
How To Set up an Instagram Business Account Step-by-Step
So, you’ve decided to take the leap and open up an Instagram Business account. Great decision! Here’s how you set it all up and optimise it for the best chance of success.
If you’re creating a brand-new Instagram account:
- Download the mobile app or head to http://www.instagram.com.
- Create an account using an email address. The best practice is to select an email address that is related to your business. Bonus points if it’s an email address that you have several business contacts on, as they will be able to find your account through the “Find Friends” feature.
- Select a username and password. Your username should be your company name, or as close to it as you can find (more about this below)
- Select a profile photo and fill out your name, bio, and website/contact information. (more about this below)
- In the Instagram menu, select “Settings,” then choose “Account.”
- Scroll down to the bottom of the “Account option,” and click “Switch to Professional Account.”
- Select a category for your business.
- Select “Business” as your account type.
- Review your contact information.
- Connect your Facebook business page, if you have one. If not, now is the time to create one! While this is technically optional, it’s highly recommended. Since Facebook owns Instagram, connecting your Facebook business page is needed to access the full range of tools that Instagram Business has to offer.
- Voila! You are now the proud owner of an Instagram Business account.
If you’re switching from a pre-existing Instagram personal account:
- In the Instagram menu, select “Settings,” then choose “Account.”
- Scroll down to the bottom of the “Account option,” and click “Switch to Professional Account.”
- You can either choose to “Switch to Professional Account,” or “Add New Professional Account” to your existing profile.
- Select a category for your business.
- Select “Business” as your account type.
- Review and update your contact information as needed.
- Connect your Facebook business page, if you have one. If not, now is the time to create one! While this is technically optional, it’s highly recommended. Since Facebook owns Instagram, connecting your Facebook business page is needed to access the full range of tools that Instagram Business has to offer.
- Make changes to your profile photo, name, and bio as needed. Instead of your personal information, these should now pertain directly to your brand.
- Voila! You are now the proud owner of an Instagram Business account.
Optimising Your Instagram Business Profile
Now that you’ve put the work into setting up your Instagram Business account, it’s important to make sure it’s fully optimized, so that your work doesn’t go to waste.
Your Instagram profile is the first thing people will see when they land on your profile. It should instantly and clearly explain who you are, what you do, who you help, and what kind of content you create. The goal here is to get them to click on that “Follow” button.
How to Choose a Profile Photo
Firstly, choosing a good profile picture is key. Your profile picture will likely be the first thing people notice when they come to your profile, so make it a good one! Humans are visual creatures, and people will respond (either negatively or positively) to whichever photo you choose.
Instagram profile photos are little circles, so your challenge is to select an image that represents you and your business in that tiny space!
You can use a logo if you are a business or company where there is more than one person in the business. If you are the only person behind your brand, then a personal photo is the way to go!
Follow these tips to find a suitable profile photo:
- Make sure it is high resolution (a blurry image will scare people away!)
- Have your head and shoulders in the photo
- Unless your business directly pertains to a certain holiday or time of year, it’s best to keep your profile picture seasonless.
- Have an uncluttered background
- Make sure that the colours in the image match whatever colour scheme you want your Instagram posts to have. For example, if the rest of your Instagram has cool, blue and green tones, try not to select a red profile picture.
- Your profile photo should match the overall feel that you want for your brand. For example, if your brand is fun and down-to-earth, don’t use a corporate headshot.
Your Instagram profile photo should match the images that you use for other social channels, to create consistency and an easily recognisable look.
YOU MAY ALSO LIKE: How to write a good Instagram caption
How to Select Your Username
You will have two names in Instagram:
- Your username (which is your instagram handle)
- Your name (which shows at the top of your bio)
Choosing your Instagram username is quite simple. As mentioned previously, try to make your username as close to your brand name as you can. However, if the name you want is taken, you can always play around.
For example, if your business is called “Anna Designs,” but the username @annadesigns is taken, try variations like “anna.designs” or “anna_designs”. If it’s useful, you can also add your location in your username, i.e., “annadesigns_auckland”
Whatever Instagram username you choose, customers should immediately be able to connect your Instagram Business profile with your brand.
How to Write an Impactful Instagram Bio
Your Instagram bio is your (potential) followers’ introduction to your brand. You want to make your account appealing to new followers, provide a clear overview of your business, and make it easy for people to learn more about your business.
Your bio will be made up of:
- A name
- A blurb explaining what to do and who you help
- A call to action
- A link
Let’s have a look at each section in more detail:
Choosing your name
Firstly, you need to choose your name. If you weren’t able to get the exact username you wanted, this is especially important. You have only 30 characters to use as your name so make them count!
You can use vertical slashes to add keywords next to your name, to make it clearer to convey what it is that you do. You could simply have your name and your business name as your name, for example:
Anna | Anna Designs
But since your name will factor in when people search on Instagram, it is a good idea to include a couple of keywords. Think of words that people may use to search for a business like yours. For example, your name could be:
Anna | Brand Designer or Anna | Logo Designer (you get the idea!).
You can also add an emoji if relevant.
Writing your bio
Once you get to the bio section, you should create a short and engaging introduction for your business. Once again, it is a good idea to include some keywords.
Essentially, you have 150 characters to emphasize your value proposition, showcase your brand voice, and include a call to action. Through reading your bio, customers should know exactly what you offer, and what you want them to do about it.
Use emojis and spaces to make your bio more attractive and easy to read. Don’t just include a 150 character paragraph.
Your bio should, overall, carry the same tone that you’ll use when writing the captions of your posts – whether you prefer to be more serious, conversational, kind, sarcastic and/or humorous, keep it consistent throughout your entire profile.
Writing your call to action
Your call to action guides people to what to do next after reading your profile. Don’t just assume that they will know what to do next – tell them!
Call to action examples include:
- Encourage people to follow you
- Direct them to where they can learn more about your services
- Get them to download a freebie
- Ask them to check your website
- Get them to send a DM
- etc
Choosing your link
At the bottom of your bio you have space to include 1 link. This can be a link to your website or, ideally, a custom made landing page where people can get an overview of your products and services.
In my landing page I encourage people to buy my products, download some freebies or read my blog. Here is what it looks like:
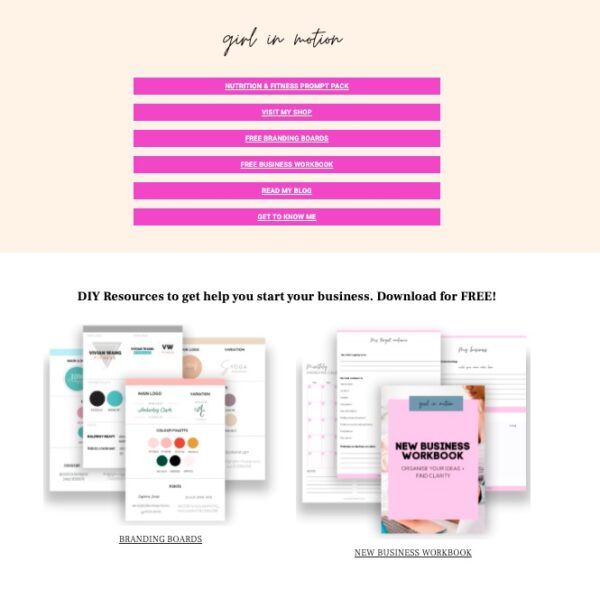
I made my page using Elementor, but you can also make your own using free tools such as Linktr.ee or Canva.
Instagram Bio: Final Words
How are you feeling about creating your Instagram bio now. Sounds tricky? Well, don’t worry, it doesn’t have to be!
Have a play writing different versions of your bio using the tips above until you come up with the winning version of it. It will take a bit of trial and error, but you will get there (and you can always keep tweaking your bio as your business grows and evolves!)
YOU MAY ALSO LIKE: How I use a scheduler to create a month of Instagram content in a few hours
How to Create the First Post on Your Instagram Business Account
Well done… You’ve officially set up and optimised an Instagram Business Account that you can now begin to grow. It’s time to create your first post.
Your first post should be an introduction to your business. This is your time to say hello to the Insta community. What do you want to say about you and your business?
Here’s a snapshot of my first ever post on Instagram:

Examples of things to include:
- Your business at a glance
- How and why did you get into this business?
- What inspires you
- Who you help
- Your background as a professional
- What can you offer to your customers that nobody else can?
- What makes your business special?
- What are you hoping to achieve with your IG account?
- Who do you want to connect with?
- A few interesting facts about you
- Where you are from/where do you live
- What can people expect to see from your account
- Invite people to follow your journey!
These are all questions that can be answered in your first Instagram post. Of course, you don’t need to answer them all in one post, but you get the idea!
While providing these answers, you should still try to keep your caption as succinct as possible to maximise the possibility of your followers reading the whole thing.
You should also use this opportunity to curate your specific brand voice, as was discussed above.
Introduction Post Photo
Your introduction post should include a photo of you. Choose an image that reflects your brand and what your business is all about.
Hashtags
One of the best things that you can do to start growing your account, is to use hashtags. Hashtags put your post in front of people that are looking for content just like the one that you are sharing.
Current best practice is to use about 8-12 hashtags on each post. You should spend a bit of time researching the best hashtags for your industry. Try a few and see what works and what doesn’t
I use Tailwind to do my hashtag research (and schedule my Instagram posts!)
Call to action
Every post should include a call to action– in this case, it should be for people to follow you!
Emojis
Use emojis to make your caption more attractive and improve readability.
Engage and connect
Once you get your first few comments, engagement is key! Instagram is a great way to build a community, so make sure you take advantage of that.
Save heaps of time using an Instagram scheduler
I know what you are thinking: creating a regular stream of high-quality content to post is going to be so time-consuming.
Well, let me give you a little tip – using a scheduler to batch create posts in advance can save you SO much time, help you get organised, and remain consistent!
There are a few options out there, but my scheduler of choice is Tailwind. I’ve been using it for over a year and it has made my life so much easier.
Tailwind has lots of awesome features. These are some of my favourites:
Drag and drop grid design: The simple drag and drop system allows me to move around my posts easily to create an ideal look and content mix. It is also fun to use!
Visual planner: I am a visual person so I really like being able to preview what the content is going to look like in my feed.
Hashtag tools: Tailwind has a built-in tool to research and save hashtags to maximise exposure. I can also post my hashtags in the first comment just by ticking a box.
Optimal post times: Tailwind recommends me when it is the best time to post by analysing when my audience is more active.
Thanks to Tailwind I can schedule over a month of content in just a few hours and ensure that my feed will be visually attractive and brand-aligned.
And the best news is that you can try Tailwind for free! Check them out here.
And if you want to learn about how I batch create my Instagram posts in advance to save heaps of time, head to this article where I share my step-by-step Instagram posting system.
In Conclusion: Setting up an Instagram Business Account.
Posting on Instagram requires work, time and dedication on an ongoing basis. So, why bother?
Well, it’s important to remember that social media is no longer just a fun-to-have item in the realm of business. Having a social media presence allows you to connect with your ideal customer, showcase your uniqueness, and signal to those customers that you are a credible business that they can trust. Over time, Instagram can help you get leads, nurture them, and convert them.
By setting up and optimising your Instagram Business Account plus publishing a compelling introductory post, you are well on your way to creating a strong social media presence.
Download my FREE instagram template pack or choose something from my shop to get you started on your Instagram Journey.
Try Tailwind for Instagram for Free
Save heaps of time and make your life easier using a scheduler. Get a free trial of Tailwind for Instagram.
Want more tips and inspiration? Check out these posts:
- 6 amazing tools to grow your online business.
- How much does it cost to start an online business.
- How to stay motivated when starting a business.
Latest blog posts:

